Tuesday, September 18, 2012
Sunday, September 16, 2012
What Scale is Scenery?
Funny thing happened on my way to the forum (model rr club) today. I turned around and came home. Nebraska Huskers were playing football on TV. Actually playing in Memorial Stadium located in Lincoln. Memorial Stadium seats over 86,000 people, making it the second largest city in the state, second only to Omaha. I always thought it was third behind Omaha and Lincoln. But the TV said second and if they said it on TV it must be true. They have been sold out for over 360 straight games so they are adding 6,000 more seats and luxury suites for those like Larry the Cable Guy; ya, just another home town boy like Johnny Carson and others. Watched the game. WE WON! Went back out about 1pm with three boxes and another roll of Plaster Cloth.
I wanted to see if my full length (80 foot) HO passenger cars would fit around the turns and through the cuts. They made it fine with a bit of unrealistic overhang at the corners, but no scrapes. I forgot my big Pacific steam loco was broken so used a couple of little steamers to pull 3 or 4 cars around the upper level.
Still not making any progress on the scenerys second coat of plaster cloth when I spotted a box I had brought out some weeks ago labeled "On30 trains". OK, I wondered if they would make it around the layout; O scale (1:48) narrow gauge trains running on HO (1:87) track, scenery and clearances. It worked. Round and round they go, where they stop nobody knows. But, the Phantom do! When I tried to use the upper reverse loop there was one rock too much. Quick blast of some dynamite (really just a snip of the scissors) took care of that. Getting more nerve I ran it down to the lower level. Bump, it hit a cardboard truss support of the 3 section. Tore off the cardboard. Bump, hit the 1/2" pressed board sub-roadbed. We designed the layout with 3-1/8" clearances. The On30 locos require 3-1/4".
So now the question again. What Scale is Scenery? Here are a few pictures. What scale do YOU think it is?
 |
| Yes, there is that nasty rock outcropping I had to blast away. |
 |
| The same cut before I tried the branch to the right where the overhanging cowcatcher caught the nasty rock. |
 | |
| You have to admire the detail that O scale allows. Did I ever tell you that I like cute? |
 |
| Did I ever tell you I like cuts? |
 |
| And still need to add some industry on the branch to the right. |
Keep in mind the scenery is without color or texture, only the basic shape and size. I took several videos, but was unable to load them. Maybe just too big. If you know how drop a line in the comments below.
Armchair
Tuesday, September 11, 2012
LO#13 - Covering the Cardboard Strips
My last post, LO#12, consisted of a lot of pictures of hills and cuts formed from corrugated cardboard strips interlaced and secured with dabs of hot glue. Both strips and hot glue are new to me as I have lived with yellow carpenters glue and foam-core board for the last several years. Today (Tuesday 9-11-12) I covered those cardboard strips with the first layer of plaster cloth. I failed to get any shots of how I use the strips so I will delay the details until later.
Here are some 'Before' and 'After' shots to compare todays progress.
#1


#2


#3

This is the upper track (as it leaves the 3 section bridge) passing through the cut just above the creek.

Here is a better shot of "Two Tired Creek" from the 'other' end located on the 'other' long side opposite all the other pictures. Marvin has done a really great job with the coloring and texture, using many of the artistic skills he uses on his original PRR railroad paintings.
Now, just a couple thoughts on the past couple days work. Corrugated cardboard strips can be cut in two ways; LENGTHWISE, along with the corrugations and CROSSWISE, across the corrugations. Lengthwise produces a stronger strip that I prefer for the vertical supports. Crosswise produces a weaker, but more flexible strip that I like to use in a more or less horizontal position to interweave between the vertical strips. To increase the flexibility I pull the strips over the edge of the table from both sides. I also do it with my fingers, but watch out for paper cuts.

This will be the road passing under the track to connect the upper level (maybe I will call it 'Overton' or 'Highland') to the future 2'x8' extension with yard, engine facilities and maybe some industries and staging.
This time I tinted the water that I wet the plaster cloth with. I mixed several colors to get something of a ground color. It is not as dark as I would like but will prevent the white spots if chipped or scrapped. If you work the plaster cloth with your wet fingers or foam brush it will begin to blend and cover the course 'cloth' weave. Saturday I will add the second coat of cloth and the following Tuesday begin a couple coats of Light Weight Spackle. I color and dilute the spackle with water to make a thick, soupy consistency and apply with a 2' foam brush and try to hide cloth details. To help hide the weave and edges I have been 'stippling' the spackle coat using the side of a 2" foam brush to quickly tap the still wet surface, drawing little beads or pimples of spackle. I am still not really happy with the results, but does do away with the dull smoothness of just brushed spackle.
Hopefully more-useful info for the next post.
Armchair
Sunday, September 9, 2012
LO#12 - Creating Hills
How high are the hills? How deep the cuts? Last week I got the hot glue gun going, cut a lot of cardboard strips and spent 5 hours putting it all together along the 10 foot side of the layout.
 | ||||
| Tunnels need BIG hills to look real. |
 | |
| Now that is a HILL! |
 |
| And this is a deep cut revealing Marvins head. |
After a week to think about it, the skinny cross section of the hill needed to be dealt with by lowering the height of the front face and the depth of the cut. Out came the scissors and several inches removed from the hill. Here are the results to compare.
|
| The hill is still big enough to look real. |
 |
| The cut looks better, even without Marvins head. And the branch has a nice cut also. I like cuts! |
While I was working on the long side of the layout, Marvin was working on our creek, a small but wonderful view site.
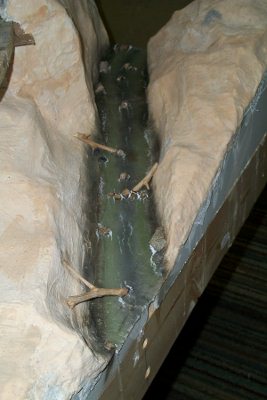 | ||||||||
| Marvin has turned my quiet, clean, mountain stream into a littered backwater he calls "Too Tired Creek" in reference to the two old tires half way up and my often expressed condition. |
Until Tuesday,
Armchair
Tuesday, August 21, 2012
LO#11 - Touch-up on the Layout
Before we got started today Marvin took his PRR K4 Pacific out for a run (just to test the track).

While much of the layout is still without any scenery work, the scenic end with rock cuts, tunnel, bridges and more is taking shape and is semi finished. Before the tunnel portals can be enclosed the ballast must be applied to that area. I use a small brush, normally used to apply flux to copper fittings before soldering, to apply full strength white glue to the side slopes of the cork roadbed and sprinkle a generous amount of ballast to the area. I do this for about 6" into the tunnel and an inch or so outside. After it sets for about 30 minutes I vacuum and collect the excess ballast using an old handkerchief over the hose end where it enters the machine. By doing the sloped edges first it provides an edge to hold the rest of the ballast in place. Now I pour ballast over the ties, both between the rails and over the ends of the ties, and use a small foam brush to level the ballast between the rails and level with the tops of the ties all the way to the edge where the ballast was previously glued. When leveled I mist the ballast with a spray bottle of wet water (a drop or two of dish soap) until wet and then drop white glue diluted half and half with water onto the wet ballast and allow it to soak in. When set I vacuum the excess as before.
 | |||||
| This ballast will be just inside the tunnel portal. |
 |
| Ballast as seen from outside the tunnel portal. The edges need to be cleaned up before we close the tunnel. |
Marvin has been painting the small creek bed and today started to apply gloss medium to give the surface a wet look. Several more coats ans some assorted debris will be added before it is complete.
 | |
| Our little creek serves no purpose but to add interest to an empty corner. |
Glen Larsen, introduced last week, was put to work lightening the dark gray I applied last week to the rock cuts by adding a coat of light weight shackle thinned with water and some 'sandstone' acrylic paint.
 |
| Rock cut and mine area with spur track. |
Armchair
Sunday, August 12, 2012
LO#10d - Updates on the 5'x10' 8-12-12
Unseen changes are hard to see. Marvin has painted all the track and turnouts to blend their color and now has to clean out the turnout (switch) points of any stray paint, clean and check, clean and check.
Our newest 'year round' member is Glen Larsen. Glen has a backyard shed he hopes to convert into a train room in the near future after clean-out, adding insulation and A/C.
Fellow "Founding Member" Marvin Crim feels the need to run some trains after his long time track laying and wiring efforts.
I, on the other hand, keep my nose to the grind-stone and continue adding ground surface to the layout.
I have been applying the second coat of plaster cloth so white on white doesn't show very well. The two layers are to give it strength, followed by a couple of colored, flowed and brushed coats of lightweight spackle to create realistic texture.
Slow, but sure progress. That is the motto.
Armchair
 | |||
| Air brush painted rails and ties to take away the "New" look. |
Our newest 'year round' member is Glen Larsen. Glen has a backyard shed he hopes to convert into a train room in the near future after clean-out, adding insulation and A/C.
 |
| Glen L. is shown here trying out one of his long stored HO engines. |
Fellow "Founding Member" Marvin Crim feels the need to run some trains after his long time track laying and wiring efforts.
 |
| Marvin is helping Glen L. check another engine from his stored supply. |
I, on the other hand, keep my nose to the grind-stone and continue adding ground surface to the layout.
 |
| Cardboard strips will change a flat foam sheet into a slopped and textured blasted wall for the mine. |
 |
| And here is the other side of the blasted wall, all that is left of the original hill. |
I have been applying the second coat of plaster cloth so white on white doesn't show very well. The two layers are to give it strength, followed by a couple of colored, flowed and brushed coats of lightweight spackle to create realistic texture.
Slow, but sure progress. That is the motto.
Armchair
Thursday, August 9, 2012
LO#1a - Layout Track Plan for 5'x10'

Here You see the Original Drawing from Dec. 1967 Model Railroader. This is shown with the original 4'x8' grid markings. Most of the recent scenic work with profile boards and plaster cloth has been at the lower part of the plan where the lower track curves under the upper and dives into a tunnel. This is also where the 3 section truss bridge will be placed.
Sorry about how long to post a track diagram. I just figured how to import images from email today, I guess you can teach an old dog new tricks. More later.
Subscribe to:
Comments (Atom)