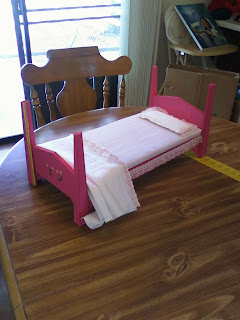
TOYS FOR KIDS: - For many years I have been making toys for the grand-kids; doll beds, wooden cars and trucks, etc. Lately, my interest in Foam-Core Board, a new material for me, has opened a new wave of toy building for me. Christmas 2010 in Dayton, Nevada, introduced me to a new grand-daughter, Olivia and her new dolly. Well, a dolly needs a bed, so it was off to the hobby store for foam-core board and paints, and to a sewing shop for cute fabrics, lace and fabric glue.
If you would like to make a similar bed for your little girl follow the instructions below
I will be adding a post on how to use Foam-Core board, buying, cutting, gluing, painting, etc. Look for it soon!
About the bed. It is made entirely of 3/16" foam-core board. I started by building the "box spring" 1-3/8" deep, 9" wide and 20" long. The top and bottom boards are 9"x20", sides 1"x20", ends and 3 inside stiffeners are 1" x8-5/8". Dry fit the pieces to ensure that all pieces will fit on the top surface of one board. Locate the 3 stiffeners about equally spaced between the ends. Trim if needed.
Glue one side piece vertically to one top-side edge of the big board followed by the 2 ends and 3 stiffeners. Note: All these are mounted on the top face of one board and all joints are glued. Now glue the remaining side to close in the box. There should be the required 3/16" space on the big board. Now apply glue to all the edges of the vertical pieces and place the other big board on top. Add some weights (soup cans) and let dry.
The 4 posts are each made of 4 identical pieces 9" long and tapered from 3/4" wide to 1/2" wide. If careful you can nest them alternating one up and one down. Mark the square, 90 degree angle, corner of each of the 16 pieces Begin forming an ell by placing one leg flat and gluing a second leg vertically, 90 degree edge on 90 degree edge. Nest the third leg inside the ell (90 degree edge inside) making sure it extends out the 3/16 thickness and glue the matching face and edge. Repeat with the fourth piece. You may need to clamp the pieces while the glue dries. Clothes pins should do the job. If you have succeeded it placing all the pieces correctly you will have a leg that will stand straight up and all the outside edges will have a 3/16"step in them. OK? Now dry fit a second leg matching them back to back. This will produce a left hand and a right hand pair of legs. If you do mark them L and R and make another left and right pair.
Now make 8 gussets with a 90 degree corner and two 2" legs. These will support the headboard and box-spring. Hold the leg (3/4" down) vertically on a flat surface and glue one gusset to the inside corner of the ell, point down, equal to the bottom of the leg. This gives a flat 2" surface on top. Now glue a second gusset against the other inside leg of the ell, again point down. This will give you a 2" ell support on the inside of the leg. NOTE: Use care when locating the gussets as the flat surfaces should all be equal height.
To make the Head-board cut a piece of foam-core board 9" x 4" and trim one (top) edge as desired. The Foot-board is similar but only 3" high, and also trimmed to suit. Now take a look at one of the legs. You will notice that one side is 3/16" longer, the thickness of the foam-core. Place the leg down on the work table with the long edge pointing up. The long leg of the post will be the outside leg that mates with the box-spring. Note if it is marked L or R and find one of the other hand leg. Place the posts so the short legs are flat on the table and pointing at each other. Place the head-board (9"), between the posts and laying on the flat down surface of the post so it rests on the gussets. NOTE: The head and foot boards are the same 9" as the box-spring which will fit into the posts, against the head or foot board and onto the other set of gussets. Repeat with the foot-board. If all is well glue the head and foot boards, using all mating surfaces and edges. Set aside to dry.
The last step is to dry fit the box-spring between the head and foot boards. It should fit snugly between the inside of the posts, against the boards and rest on the gussets. Apply glue to all the mating surfaces, place the box-spring into the head and foot boards and hold in position for a few minutes. I found it easier to set the assembled bed with the posts on the table and I only had to push it together. When dry, check for a wobble if one leg is longer or shorter than the rest. If longer sand the bottom, if shorter maybe glue a thin card to shim it to the correct height.
You now have a bed. I will be adding pages for painting and making the mattress and bed covers. Sorry about the long page, I will break them up in the future. Armchair


